4.0L engine - Thermostat removal
System coolant routing - 4.0L engine
WARNING: DO NOT LOOSEN THE RADIATOR DRAINCOCK WITH THE SYSTEM HOT AND PRESSURIZED. SERIOUS BURNS FROM THE COOLANT CAN OCCUR.
1. Drain the coolant from the radiator until the level is below the thermostat housing. Do not waste reusable coolant. If the solution is clean, drain the coolant into a clean container for reuse.
2. Remove radiator upper hose and heater hose at thermostat housing. See cautions above for removing radiator hose clamps.
3. Disconnect wiring connector at engine coolant temperature sensor.
4. Remove thermostat housing mounting bolts, thermostat housing, gasket and thermostat. Discard old gasket.
5. Clean the gasket mating surfaces.
Hose clamp tool #6094
WARNING: CONSTANT TENSION HOSE CLAMPS ARE USED ON MOST COOLING SYSTEM HOSES. WHEN REMOVING OR INSTALLING, USE ONLY TOOLS DESIGNED FOR SERVICING THIS TYPE OF CLAMP, SUCH AS SPECIAL CLAMP TOOL MILLER p/n 8495A. SNAP-ON CLAMP TOOL p/n HCP20 MAY BE USED FOR LARGER CLAMPS. ALWAYS WEAR SAFETY GLASSES WHEN SERVICING CONSTANT TENSION CLAMPS. A NUMBER OR LETTER IS STAMPED INTO THE TONGUE OF CONSTANT TENSION CLAMPS. IF REPLACEMENT IS NECESSARY, USE ONLY AN ORIGINAL EQUIPMENT CLAMP WITH MATCHING NUMBER OR LETTER.
4.0L engine - Thermostat installation
1. Install the replacement thermostat so that the pellet, which is encircled by a coil spring, faces the engine. All thermostats are marked on the outer
flange to indicate the proper installed position.
(a) Observe the recess groove in the engine cylinder head.
(b) Position thermostat in groove with arrow and air bleed hole on outer flange pointing up.
2. Install replacement gasket and thermostat housing.
CAUTION: Tightening the thermostat housing unevenly or with the thermostat out of its recess, may result in a cracked housing.
3. Tighten the housing bolts to 16 ft. lbs. (22 N·m)
torque.
4. Install hoses to thermostat housing.
5. Install electrical connector to coolant temperature sensor.
6. Be sure that the radiator draincock is tightly closed. Fill the cooling system to the correct level with the required coolant mixture. See refill directions above.
7. Start and warm the engine. Check for leaks.
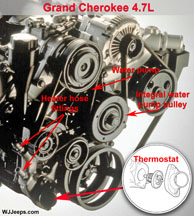
4.7L engine - Thermostat removal
WARNING: DO NOT LOOSEN RADIATOR DRAINCOCK WITH SYSTEM HOT AND PRESSURIZED. SERIOUS BURNS FROM COOLANT CAN OCCUR.
1. Disconnect negative battery cable at battery.
2. Drain cooling system. Do not waste reusable coolant. If solution is clean, drain coolant into a clean container for reuse. If thermostat is being replaced, be sure that replacement is specified thermostat for vehicle model and engine type.
3. Remove splash shield.
4. Remove lower radiator hose clamp and lower radiator hose at thermostat housing. See cautions above for removing radiator hose clamps.
5. Remove thermostat housing mounting bolts, thermostat housing and thermostat.
4.7L engine - Thermostat installation
1. Clean mating areas of timing chain cover and thermostat housing.
2. Install thermostat (spring side down) into recessed machined groove on timing chain cover.
3. Position thermostat housing on timing chain cover.
4. Install two housing-to-timing chain cover bolts. Tighten bolts to 115 in. lbs. (13 N·m) torque.
CAUTION: Housing must be tightened evenly and thermostat must be centered into recessed groove in timimg chain cover. If not, it may result in a cracked housing, damaged timing chain cover threads or coolant leaks.
5. Install lower radiator hose on thermostat housing.
6. Install splash shield.
7. Be sure that the radiator draincock is tightly closed. Fill cooling system. See refill directions above.
8. Connect negative battery cable to battery.
9. Start and warm the engine. Check for leaks.


